
Blurring Media
Product: Prepared All Levels
Audience: Supervisors, Administrators
Last Updated: 03/11/2025
Outcome Statement
After reading this section, you will understand how to use the Prepared Media Blurring feature, including how to control blurring preferences, customize settings, and ensure media is appropriately blurred for dispatchers and call takers.
Overview
The Prepared Media Blurring feature allows site admins and supervisors to mandate blurred media for dispatchers and call takers, offering an additional layer of privacy and security. Supervisors and admins still have the option to control whether to blur media for their own accounts. This feature is essential for protecting sensitive information during emergency calls.
Step-by-Step: Using the Prepared Media Blurring Feature
Step 1: Accessing the Prepared Media Blurring Settings
Navigate to Settings: Go to the Settings section in the Prepared platform.
Scroll to Agency Tab: Find the Agency section within Settings.
Locate Media Blurring Preferences: Here, you will see the option to manage Media Blurring settings.
Configure Preferences: Set the preference for your agency—either mandate blurred media for all dispatchers and call takers or give individual accounts the option to control blurring.
Important: Only users with supervisor or administrator access can modify these settings. If you need non-supervisors to use this feature, you will have to share the preferences with them.
Step 2: Applying Blurred Media for Dispatchers and Call Takers
Mandate Blurring: Site admins and supervisors can mandate blurred media for all dispatchers and call takers.
Individual Control: Supervisors and admins have the option to blur media for their own accounts based on their discretion.
Step 3: Using the Blurred Media in Incidents
Blurred Media View: When the feature is enabled, media content, such as photos or videos, will automatically be blurred for dispatchers and call takers.
Viewing the Incident: Dispatchers and call takers will see the media in a blurred format, ensuring sensitive information is not visible.
Support & Additional Resources
Prepared Media Blurring Feature Guide:
Product: Prepared Media Blurring
Audience: Supervisors, Administrators
Last Updated: 03/06/2025Outcome Statement
After reading this section, you will understand how to use the Prepared Media Blurring feature, including how to control blurring preferences, customize settings, and ensure media is appropriately blurred for dispatchers and call takers.
Overview
The Prepared Media Blurring feature allows site admins and supervisors to mandate blurred media for dispatchers and call takers, offering an additional layer of privacy and security. Supervisors and admins still have the option to control whether to blur media for their own accounts. This feature is essential for protecting sensitive information during emergency calls.
Step-by-Step: Using the Prepared Media Blurring Feature
Step 1: Accessing the Prepared Media Blurring Settings
Navigate to Settings: Go to the Settings section in the Prepared platform.
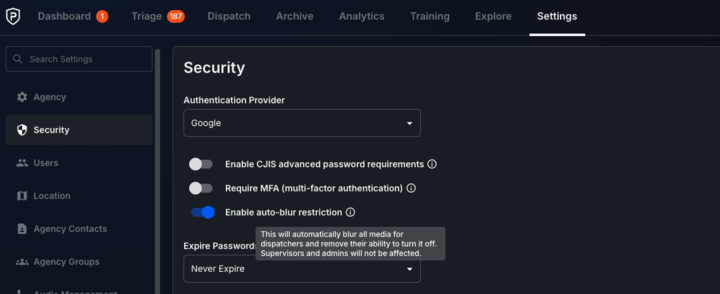
Locate the Security Tab: Located on the left pane.
Locate Enable auto-blur restriction: Located within the Security pane. .
Choose Preference: Toggle swtich to the right. And toffle will turn blue to restrict dispatcher view of media.
Important: This will automatically blur all media for dispatchers and remove their ability to turn it off. Supervisors and Administrators will not be affected.
Important: Only users with supervisor or administrator access can modify these settings. If you need non-supervisors to use this feature, you will have to share the preferences with them.
Support & Additional Resources
Prepared Media Blurring Feature
Contact Prepared Support: Support@prepared911.com